Tuesday, May 28, 2013

Yesteryear - Old Quilt Collection, vol. 1

Not only do I love to make quilts, I own three that are quite old.  Those of you who love quilts can appreciate the work that has gone into each of these hand pieced and hand quilted beauties.  

This first one is the oldest, although I'm not sure how old, nor am I sure of the patchwork block pattern name.  Anyone recognize this block? Maybe a variation of Flying Geese?


This quilt was purchased at a Missouri flea market from a woman who owned a bed and breakfast. It was being retired because of it's deteriorating condition. I don't know if she just used it for display or actually used it for bedding.  I admired it's hand work and recognized the old feedsack materials used.  The quilt backing is made of the original advertising logo white printed sacks (circa late 1800's to early 1900's),  with printed words and brands. Used before grain sack/bag makers started printing them with patterns (circa 1920's).  I couldn't get a good picture of the backing, since the words are pretty washed out.  I don't know if they were bleached for the making of this quilt or just worn away with age.
    
I have tried to research these fabrics, many of which are now quite faded, but I haven't been able to identify any of them as to decade. (Just got a reply from another collector who things these fabrics are from the 30's.) I think it would take an expert.   Anyway, I love this quilt and only have it for display purposes, now.

BTW, it is hand quilted about 1/4 inch on both sides of every seam. A common straight line way of quilting  to secure all the layers and prevent the seams from shifting.


Each Tuesday for a few weeks, I will be reviewing these old quilts from my collection.  I hope you will join me for the Old Quilt Collection series as I revive my earlier Tuesday article tradition: Yesteryear!

P.S.  Several other previous posts are available on Yesteryear topics--just enter "yesteryear" in the search box. See you next Tuesday! 


Monday, May 27, 2013

Patriotic Napkins

Today is the Memorial Day holiday and rather than doing a memorial post, which I have done in the past,  I decided to just show you the patriotic version of my luncheon napkins done from last week's tutorial.

The fabric is a vintage style red, white and blue allover print that inspires patriotism with George Washington bust and a child Betsy Ross impersonator! And . . . of course Old Glory!


Hope you are having a great holiday! 

P.S. These are now available in my shop. Thanks!

Linking today with:
Inspire me Monday at create-with-joy.com

Friday, May 24, 2013

BBA May Challenge

Since I have been working so much with my apron orders, I really haven't had time to actually create new ideas for my crafting endeavors.  But I did get a new camera this month and I have been working on my depth of field--you know, long depth: overall landscape all in focus, or short depth: only what is in the foreground is in focus.  With this new camera, it is a matter of finding the right settings to take the desired picture.  And since our Blogging Business Artisans May Challenge is "April showers brought May flowers so let's see them! Create something with flowers and let your imagination bloom!" I thought I would use it to practice taking depth of field pictures.  This challenge was brought to us from Sharla at BeadedTail,  actually one of my Oregon state neighbors, and she has a wonderful blog, written from her animals point of view, that I am sure you will love! Please visit! 

Now, here are my flowers--Not where I want to be yet with the camera settings, but working on it!  


Magnolia  with tree out of focus


Lilac with pine tree top in the background


Snowdrops? 
These little snowdrops are gorgeous, especially if you click on the picture to get a larger and closer view.  The background is muted a bit with a soft focus.


These tiny beauties were difficult to get with a short focus, since the were so small and growing in a jumble of other foliage. But I think I was able to get some of the background softer than the actual flowers.  Could have been better, but as I say, I'm working on it!  Great Challenge!  

You can see the other challenge posts on our team blog

P.S.  I did some other pictures of flowers in a previous post about rhododendrons--one good photo there!

Thursday, May 23, 2013

Anniversary Day!

Today is the anniversary of my wholesale client's opening of their little Mill Store.  They wanted some new apron designs, and new products to celebrate. On Tuesday I showed the Anniversary napkins that I did for them.  I thought I would also show the aprons that I designed for the event.  I did a post earlier about designing the new aprons and although we didn't use all of the designs, here is what I came up with for their one year anniversary of the Bob's Red Mill little Mill Shop!  

Tour manager, Christie, wearing Anniversary apron 

Fun half Anniversary apron for sale in the Mill Shop! 

Now to come up with a design or two for Independence Day!  


Wednesday, May 22, 2013

100+ years old!


Recently my daughter bought a house that is 106 years old!    
Here are some of the sights!
Original carved door with beveled glass window


See previous post of outside 


Kitchen door


Moving in--New owner looking at pictures of original owners 
Ooohh, what creative ideas are beginning to flow!!!


linking today with:

Tuesday, May 21, 2013

Making Luncheon Napkins

Ever wanted some new napkins to set an elegant table?  Having an intimate dinner party? Trying to teach the kids to know how to behave at a dinner engagement?  Then, new napkins might be just what you need.


I have several sets of napkins for different occasions.  I love using them at Christmas gatherings, and just for fun, sometimes!  But cloth napkins can be expensive, if you don't find them on sale; and finding the right color for your table setting can be challenging. Why not make your own!

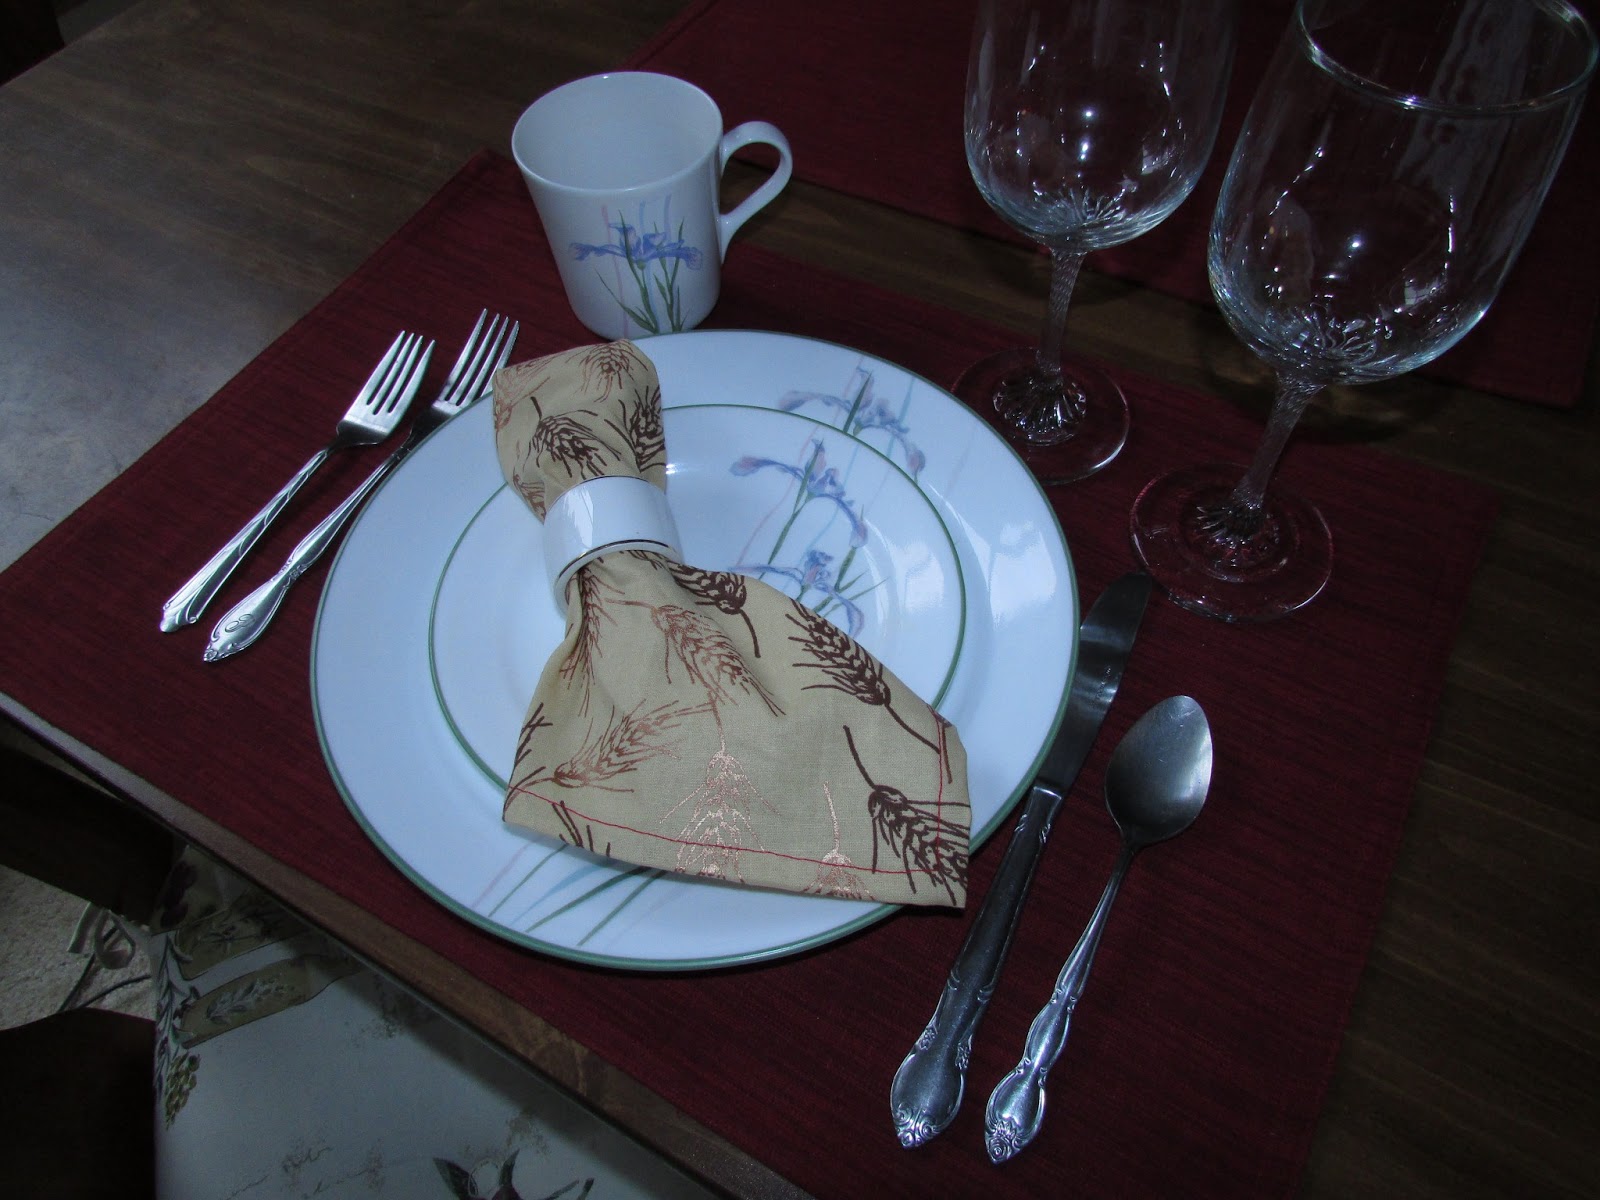
I recently had an order for some special Anniversary napkins from a wholesale client.  They are easy to make so I thought I would chronicle the process here for a tutorial.

Chose your favorite fabric; my client chose this wheat motif fabric. Cut your fabric squares accounting for and adding a half inch seam allowance on each side.


I used a rolled hem, folding over 1/4 inch (or less) and then another 1/4 inch again to sew the seam.  Start in the middle of a side, not at a corner, since it will be easier to turn the corners that way. Some of you may have an attachment for this type of seam.


Stop sewing about two inches before getting to the corner;  Keep the fabric rolled . . . .


then fold the corner in, at a right angle, approximately 1/2 inch fold over.  


Next, fold the next side up 1/4 inch, holding the corner securely.


Last, fold over another 1/4 inch and you should end up with a mitered corner . . . . .


these are sometimes hard to master, but you will get proficient with repeated efforts. (I promise.)


Final step: press and fold.  Here you see mine packaged for my client with a paper band around them.


And . . . . if you have a serger, you might want to just serge the edges with a fancy thread, it might be easier, and surely decorative!  Or use your imagination with your machine's fancy stitches for your edging seam!  Whatever you do, have fun being creative!


Monday, May 20, 2013

Upgrade Weekend

This weekend, while recovering from this flu/virus thing that has hold on me, I sat mostly at the computer on Sunday and worked on this blog.  I changed the header, since mine had been a picture of my signature Breast Cancer quilt for several years now.  I recently changed the header on my other blog, and knew that this blog needed an upgrade too!

I previously had the pink quilt picture and a pink background.  I was going for a cleaner look to exhibit my photos better on a white background.  I know that photos on a black background look really great, but I really don't like to read blogs that are on a black background, so, since I do write and have images, I chose a white background. Also changed my pages tabs and worked on my About Me page--not finished with that yet.   (Adding these pictures of the weekend-- my granddaughter's last softball game of this season and my youngest daughter's move into the new house.)

Oops, she missed this one, but got a single on the next pitch!

And . . . carrying pillows in a heavy equipment carrier for comic relief during the move!  


 My crazy sons-in-law!

And, down the hill to the truck . . grunt, grunt . . while everyone chuckled! 

Well, what do you think?  Really would like to know your opinions of my upgrade! Thanks! 


Wednesday, May 15, 2013

Looking Away!


And look what I found, hiding behind the purple pansy! 


Linking today with:

Thursday, May 9, 2013

Rhododendron Season!

Loose buds
Rhodies, (pronounced 'roadie') as we call them, are a highly used landscaping ornamental in gardens of the Pacific Northwest--also growing in the wild too.   What's a rhody, you ask?   It's an evergreen shrub---can reach small tree size, a member of the heath family.  It has rounded clusters of showy, pink, purple or white flowers and large, smooth oval oblong leaves on it's woody frame.

Our Spring can be very showy with all the rhodies! This particular one starts out with pink buds and opens nearly white!   Enjoy!


opening . . .

full bloom!
What blooms in your area of the world? 

Friday, May 3, 2013

The Making of an Apron

Apron sales at my wholesale buyer's store (previous post) are still booming!  Currently I have a special order for some monkey fabric aprons for mom and child.  Should be a fun project!


Thought I would share a bit of the making of my aprons.  Since they are my own design and because I exclusively sell them wholesale at this time, I will not share the pattern.  At the end of this post, I will share a picture of my latest design for the celebration of the store's anniversary.

The buyer and I pick the fabrics together,  then the pocket material is sent out to be embroidered.  In the mean time, I sew up the aprons; here a mother and daughter set, without pockets.


When I get the pocket material back I finish the pocket, making sure that it is lined, protecting the embroidery.


Next after attachment of the pocket, I add the straps.  I usually use cotton webbing, so I apply fray check to all the cut edges.  Since they have to dry, they are secured with a pin on a thread spool for air drying.


 I add D-Rings:


A finished apron:


I add my custom tag designed exclusively for my buyer. (I also add my company iron-on tag on the inside of the apron.)


The ones you see here have gone to the shop and some are already sold!

Now, besides the afore mentioned special order, I am working on the aprons for their anniversary sale--a new design! If you have seen the previous post or know about Bob's Red Mill, you know that their brand color is red!  And since they sell grains, this fun design is what we have come up with for the anniversary!

Wheat grains and Red dots half apron

Sew . . . what have you been up to lately?