Showing posts with label scraps. Show all posts

Saturday, January 18, 2014

Baby Shower Hostess Gift

Those of you who know me, know that I have a large family, and many, many grandchildren! Number 27, a girl, is due the middle of March! This little girl is coming to my oldest son's family. They wanted another child, but it never happened!  They actually have two girls, one age 16 and one in her early twenties!  We are all so excited for this new arrival!!!!


Today is the baby shower, and I needed a hostess gift for my hostess friend!  You all know me--the scrap lady!  I took pictures of the process, because you might want to duplicate  this set of 'baby looking' coasters for your own future hostess! (Or I will have them available in my shop :)

Sew several strips of scrap fabric, then cut strips

Cutting strips

Add white trim fabric to both sides

Chose a matching backing fabric and finish!
This will be a cute keepsake for the hostess to remember the shower!  

Thursday, September 5, 2013

Proud Crafty Grandma!

Been extremely busy this past few weeks sewing for my wholesale client--some special order aprons and working with beautiful Fall prints for their autumn stock. Will be busy ongoing, since the Christmas stock orders are piling up too!  Anyway, I have lots and lots of scrap materials when I sew continually.  I sort them into larger pieces for future crafting projects and strip pieces for future quilting.  

On Tuesday's my grandsons come over after music lessons and spend a few hours visiting.  Last week, Padraic, age 10, wanted to know if he could make something from the materials in my strip pile while I visited with his mom and entertained his little brother.  He chose the fabrics--took his lead from my crazy quilted Christmas stockings. (Previous post about them.)

Here's what he came up with:
Strip Christmas tree!


He took it home to hang.  I don't know if he decorated it or not!  My daughter saves all kinds of materials for his projects at home, including toilet paper rolls and Popsicle sticks and boxes.  Once he made a castle with these kind of materials!  He's very crafty; he loves to make things, using his hands! Anyway, I am a proud grandma--my family is following in my footsteps!!!!

Use it up, wear it out, made do or do without!

Monday, July 8, 2013

Weekend Crafting Activity with Scraps

Spent the weekend crafting with scraps!  If you know me at all, you will know that I don't get rid of fabric scraps!  I separate them all into piles of like sizes and if there are pieces that are at least 5 inches square I immediately cut them into circles for sewing into yo-yos at a later time.  With all my scraps sorted, I have to designate a time to use them up!  Well, this weekend was one of those times.

I sorted out scraps of green and pink in all sizes. Then sewed like sized pieces together in twos.

(Sometimes, threes, to make a small block.)
Some twosies!

 Next I sewed together several "blocks", making larger "blocks"


Sometimes this meant that I needed to cut them slightly, to fit.


Don't worry about uneven sides, nor try to match seams.  This is not purest quilting!  It's upcycling your scraps into a beautiful project that will cost you nothing but time! You end up with sheets of  patchwork "fabric", size depending purely on the scraps you have and your own process.


 Mine ended up to be approximately 14" by 20" which as perfect for the project that I had in mind. But yours could be fat quarter size or any size you prefer.

What did I make from my patchwork fabric (and some other scraps of trim)?


What-do-ya-think?  Pretty good, huh, from my scrap pile!

Linking today with:
Create-with-Joy's Inspire Me Monday

Tuesday, February 12, 2013

More Scrap Fun!

I love using up my scrap yardage.  A few weeks back I made a Spring pillow cover for my sofa that started with making a quilting block from my scraps (see the end of the post), which I previously blogged about.

I also made a table runner which started with a couple of quilt blocks.  i loved the colors in the block and it seemed to scream out at me with another idea for Spring--tulips!


I have listed this in my Creations shop today!  
Someone will be the lucky recipient!

What is new in your shop or craft?

Monday, January 21, 2013

In Progress!

Some time back, I started a scrap quilt and had wanted to finish in one weekend.  But, alas, life interrupts us, and the quilt went into the unfinished black hole. . . er . . . box!  I am now a guest in a friend's awesome studio, with lots of room for quilting.  I had wanted to quilt three already finished tops into finished quilts in the time that I will be here in this studio.

One block of the unfinished top

I started on the afore mentioned scrap quilt and was going along at a pretty good pace, when I ran out of the thread that I had brought.  You would think that my friend's studio would have some similar black thread that I could use and replace, but no!  I tried some thread that she did have, but I think it was a fine, silky machine embroidery thread, and it just would not work in the quilting machine!  When I put it in the bobbin case and tried to use it, it just made a mass of  loops on the bottom side of the quilt, no matter what I did!  I tried everything!  I finally gave up. (Remember, I am still learning.)  So here's what I have done so far and I will try  to finish it again today with some different thread that I bought.   BTW, this is free motion quilting, for those of you who are not quilters, as I know not all my readers are.

Same block  with finish quilting
I sure would like to finish this soon, so I can go on to the next one!  I hope to show you the finished quilt later this week!  Wish me luck!

Tuesday, November 27, 2012

Fabric Scrap Stockings!

Here's another idea to use your fabric scraps for Christmas!
Make a stocking 
to hang by the chimney with care.

Before I share how to make one, let me share how this idea came about! Quite a few years ago, when my first husband was going thru Cancer treatments, my oldest son's friend surprised us with a wonderfully thoughtful, creative gift for our whole family!  Our door bell rang on Christmas morning and when we went to see who it was, not a person was there, but left on the doorstep was a box of fully stuffed stockings--One for each member of our family--and we were a large family at that time.  Mom and Dad and six kids. This young lady crafted stockings for each of us.  They were handmade with our names on them.  We would have never known who made them, except one of the kids saw her down the street hopping into her car. To this day I don't remember what delights were in any of them but I still have the stockings.  Well, I have two of them; the others, I have since given to my children, now all grown.


There was nothing fancy about any of the stockings.  She made them from scraps of fabric decorated with ribbons and trims.  My husband's stocking, said "Darryl" with glued on letters made from bits of white trim.  For mine she used pink ribbon. They were all in random shapes of boots, heels, or socks.  Each was hand stitched using various pieces of quilted fabrics or Christmas fabrics leaving raw edges and exposed stitches everywhere!


Each had a ribbon loop for hanging.  And, obviously, each holds a special place in our hearts for her thoughtfulness and generosity, in our time of need.


Point being:  Don't sweat it! 
 Throw out the rules! 
Make something creative and don't worry about your skill level.  
Use what you have and make it fun!*


So, grab my button, on the sidebar, add it to your blog and join the party!  Write your own Christmas idea in a blog post, and don't forget to come back here on Friday to link up!  Let the ideas abound!

*P.S. and BTW, be generous this year! 
P.S.S.  More stocking ideas to come!
PSSS.  Linked up today with Sew Much Ado

Monday, November 26, 2012

Holiday Pillow Cover


Since it is the first of the month, there is plenty of time to work on this project. Other projects to follow may not be as involved as we get closer to Christmas. Whatever you chose to do this month--have fun!


Today's project -- a cute pillow cover made from scraps of Christmas fabrics (a Pillow cover tutorial). 
 

Start with a pile of Christmas fabric scraps (and a pillow form that you already have--or purchase one at the local home/fabric store, 12" by 12" for this tutorial or adjust this pattern for any size pillow you prefer.)


Start with a square piece approximately 5 inches by 5 inches.  Applique any cute design on it using scraps of felt or fabric.  You can embellish it with buttons, floss, ribbon, anything that you have available.  I used felt, embroidery floss and a fabric scrap for this snowman's scarf.  Use your imagination and have fun!  (That's the point, right?)  No right or wrong here.  


After you are finished with your applique, use strips of fabric scraps to sew on each end, log cabin style.  If you need instruction on this process, 
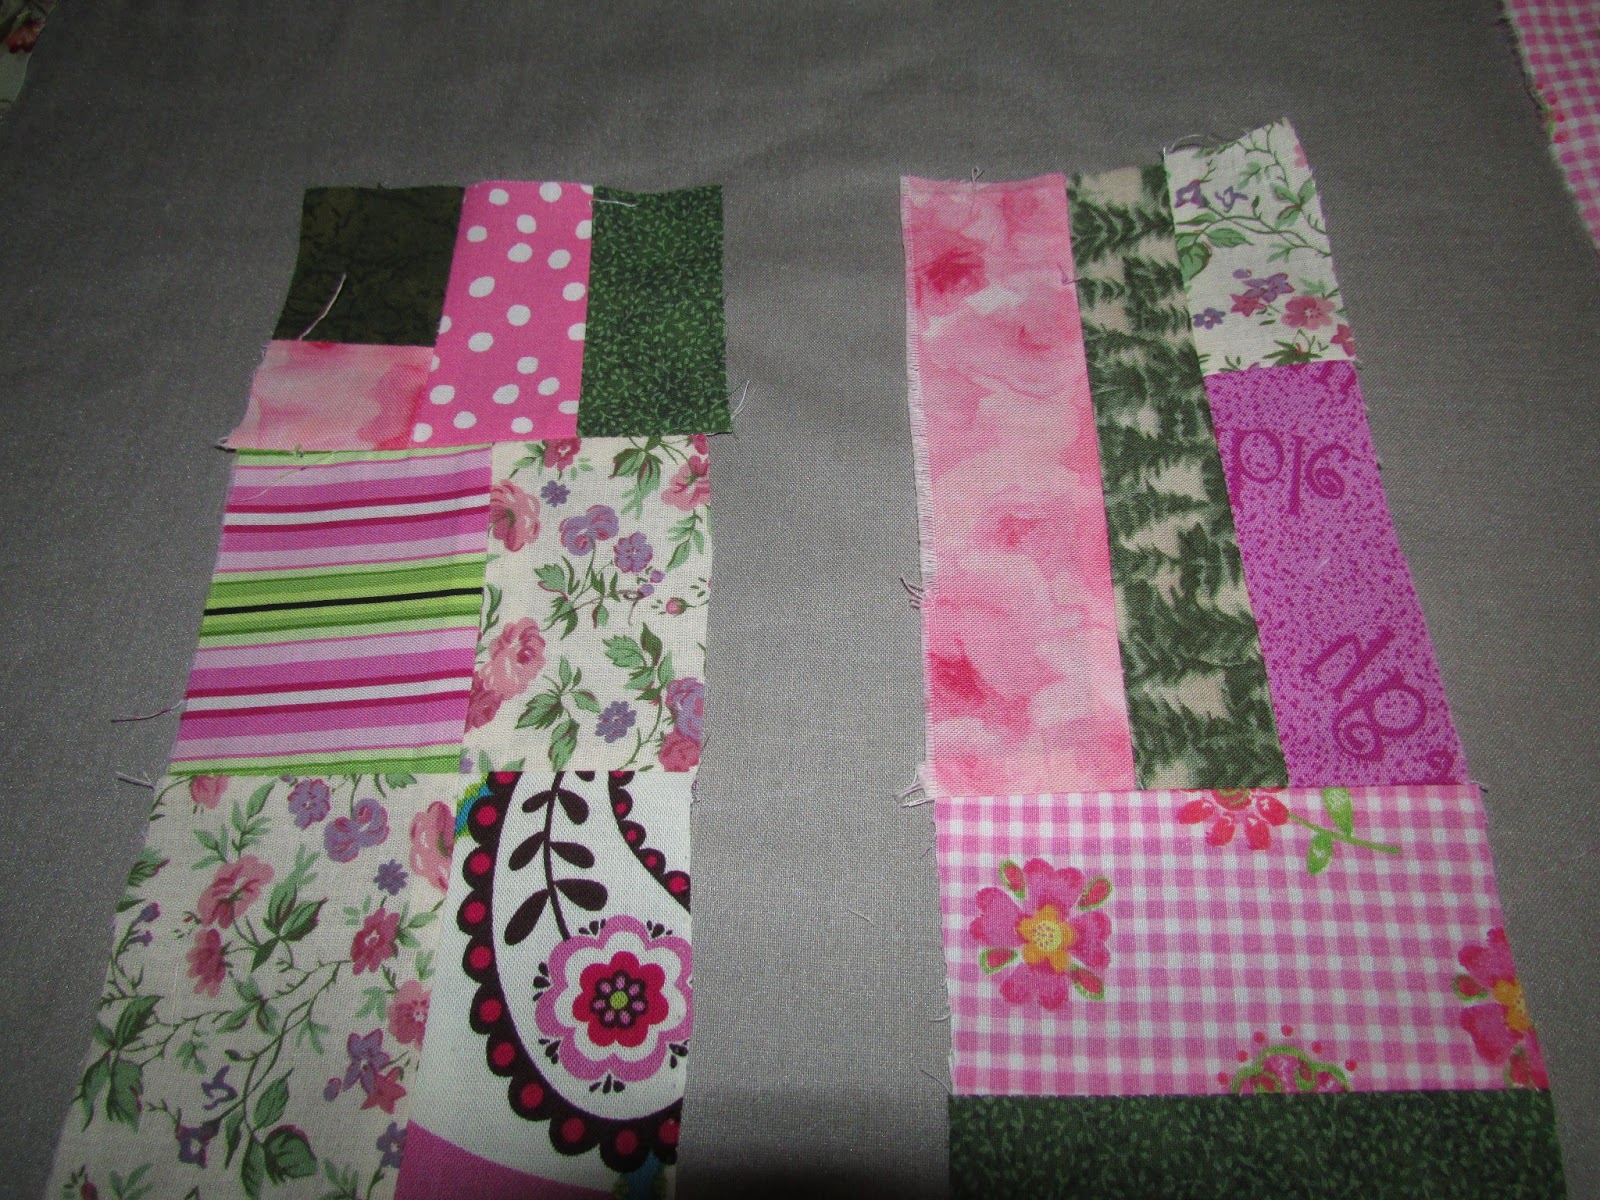
go here -- but my pieces are not as precision as in the tutorial. I personally like a less precise crazy quilt look, so I just add strips around until I get it the size that I want. Don't worry if the strips are not long enough--patch them!  Have fun creating!

making a strip longer w/ 1/4 inch seam

patched strips

Keep sewing until the finished product is big enough to be the front cover of your pillow cover--approximately 13 by 13 inches for tutorial pillow.  


After you finish the top cover, you need to make an envelope closing for the back, from two pieces of fabric--each approximately 13 by 8 inches.    Put a hemmed seam (on each piece) on one 12 inch side.  

Place the 'log cabin patchwork pieced front', right side up on a flat surface. Imagine this piece is your patchwork piece:


Lay your two 13 by 8 inch sections--face down/right sides touching each other--over lapping the hemmed sides in the middle of the 13 by 13 square.  Square up all outside edges so you have a 13 by 13 inch square (matching all the raw sides). I have used different fabrics to help you see how to lay the fabrics.  


Sew all the way around the four sides of the 13 by 13 inch square layers making a 1/2 inch seam. Trim later if you prefer.  When finished turn inside out-through the hemmed edges) and viola!  there you have your pillow cover!  (You may want to  add a button or velcro to your envelope opening, if you prefer.)  This should make your cover 12.5 inches by 12.5 inches square, just right to go over a 12 inch square pillow form.  

Enjoy!

P.S. See you tomorrow for another quick project! Also, Grab the "30 Days of Christmas Fun" Button for your blog and spread the Fun!

Monday, September 24, 2012

Broken Sewing Machine!

It's National Sewing Month and my sewing machine finally "bit the dust"! It had a good long life; I've had it since about 1979.  I gave away my sewing machine kitty (designated savings) to a family that was short on rent money, due to a lost job.  (They have since gotten back on their feet! Yay!)  I did a side job, but will not be paid for about 30-45 days.  So what does a textile artist do besides the mending?  Well. . . .

 There is more to sewing than a sewing machine. 

Sew up a pretty broach with scraps by pruittcreations

Get out the floss!  Embroidered Art Hoop by pruittcreations
Or grab your scissors and some fabric scraps and make yo yos!!!


Yo yo tree wall hanging that I am working on for Christmas


Embroidery accents sewn on

It's fun and creative! And it's what I am doing lately,
until I get a new machine :)  


Thursday, May 24, 2012

Scraps, scraps, and more SCRAPS!

While working on my regular projects, I seem to accumulate lots of scraps!   I have a little wire basket on my sewing desk that I pitch all my usable scraps into. 


When it gets too full, I stuff them in a large plastic Ziploc and hide them away somewhere--in the cupboard, under the bed, anywhere!  What to do with them--When to do something with them? Recently,  I needed the space in my cramped quarters, so I started a crazy quilt top with them.  You can do it too! Anyone can do it!  No need for fussy cutting, or worrying about cutting the patchwork pieces extremely straight.  There's really no wrong or right way to do this!  And there's no pre-prep needed to plan out the quilt top!  Just let it evolve!  A fun adventure with scraps!

You can start with any piece which serves as the middle of your finished block.  Next, sew on scraps; just match a fabric piece to any side of the first piece, making sure you sew a straight stitch.  You can even use a length of fabric that is too long for the side.  Trim it where you need it to end, once you have finished the seam. You keep building, not unlike a log cabin block (tutorial here), until you have the approximate finished size of the block you want.  Then, iron it out flat, trim any seams that are unwieldy. Next, cut a finished block, discarding the uneven and odd edge cuttings that were not used if they are too small.  Toss large enough pieces back into your scarp heap if they can be used again. 


Here I used a panel scrap for a corner. It needed to be cut to fit after the seam was finished.  I only needed a little piece of the red dot fabric to make the corner.

I'll share the progressions of one block here (Started with the purple piece):

find a piece to fit your side 

I felt it was a little short, no problem!

Added another scrap to the end of my scrap!

Regardless of the side, sew a straight line stitch-- trim later.

Finished seam.

A nearly finished block.

Trimmed and ironed--ready for use!

This is a simple way to use-up (upcycle) your scraps.  I will be sure to show off the rest of the process to a finished quilt top in future posts!  Watch for it!  And . . . try this yourself! 

Thursday, July 14, 2011

Scrappy UPCYCLED Greeting Card

I have decided to do a card making tutorial every Thursday throughout the summer!  Follow me on Thursday's for ideas and inspiration in making your own greeting cards!!

If you are like me, in this present difficult economy, you are looking for ways to cut costs and still live a similar lifestyle, like you did before the recession.  Many people save everything!  I save scraps of sewing supplies, trims and fabrics; paper; anything that I think I might use later.  I even use left over paint that is already mixed up rather than throwing it out!  I recently was inspired to make a greeting card which started from left over paint from another project.  I painted some old music paper randomly, with the remainder of some blue paint. 

I also had some card blanks, that I picked up at the local craft store for a buck.  You wouldn't have to use a pre-bought one, you could make your card from any color card stock paper that you might have.  Cut the edges with one of your fancy cutters to make it look finished.

 Next, I cut a random form from the painted music paper for a background.  I also cut another random form from a leftover piece of floral paper from a previous project. 
 Pasted on the card, they look like this:
Then for the scrappy part!  I went to my scrap drawer--yes, I have one in my plastic craft chest, top drawer!  I pulled out a handful of scraps, including a piece of gold cording, yellow bias binding, ribbon, gold and bronze trim, and a little package of pressed flowers that I bought years ago at a craft sale!


 And, voila! Here is the finished collage product, which I am quite proud!  What cost me a few pennies, would have cost about $4.00 at the card store.  And I am sure I will be happy to give this little card and someone will be happy to get it! 
 What have you done lately with your "scraps"?

Tuesday, December 30, 2008

Scrappy Days!

You know what it is like to be in-between projects? Not knowing where to start next? You've got supplies and fabrics and, probably, half-finished projects, but you still struggle to begin a new project! That's where I am right now. Christmas, and it's associated projects are over; the bazaar season is over for now; and I don't know what to begin next! So, today I got out my boxes, looked thru my stash and my supplies; and on the way cleaned and organized a few things. All the while, looking for inspiration! I'm still short some yellow fabric for the landscape quilt . . . I need hot pink thread to finish some coasters . . . I haven't decided what to do with a bag full of browns that inspired me back in the fall!

Then there's all those scraps from all my previous projects!! Don't you just hate all those left-overs! I like COMPLETED projects where THERE ARE NO LEFTOVER FABRICS! Always there is this dilemma--what to do with the scraps! I love fabrics and want to do something useful with them! I don't want to waste anything! Coming up with ideas to use the leftovers is challenging!

So . . . today I pulled out the scraps and used some of them to make coasters! Little log cabin patchwork type coasters using fabrics left from my latest quilt projects. They turned out a little larger than usual coasters, but that's OK. It's creative! Besides, some people use mongo cups for their drinks! They need larger coasters, don't they?

Try something scrappy today! You'll feel so satisfied with yourself, besides getting rid of all those leftovers!!!